Wednesday, April 30, 2008

Paint!


Today was the day. Yesterday didn't work out due to some conflicts, but all came together for today. We had fun hanging out in between coats, playing bass and Mario Cart.

Now just have to wait for the paint to dry.

Tuesday, April 29, 2008

Most Excellent Day!


After a great night on call, I got a lot accomplished on my day off.

In Dr Frank'n'bass lab, I did a complete swap of electronics between the fretless and Big Red.

The problems with the fretless improved when I grounded the bridge but the volume between the piezo and magnetic pickups was still a problem. I thought this might be the case; so that is the reason I bought an active set for the red bass. I thought I might have to swap them out.

I did have to drill more holes in the fretless. It looks alright but I was going for that minimalist look with the stacked controls.

The fretless works great but the piezo is still hotter than the other pickups. I think there is an adjustment on the preamp; I just have to research it. The piezo works, but not as well as I would like. The E string's volume is weaker than the others at times. I might disconnect the piezo and buy an tone circuit from EMG to fill in the extra holes.

The red bass now has the passive pickups. I was able to use the strat type knobs that I originally bought for it. It gives it that 70's retro look. I had to order an mini controller for the tone control, the one I have for it is too big for the space. The EMG controls were smaller than the ones I ordered from stewmac.com.

My new amp came today. It's AWESOME!

The strat bass gets a paint job tonight.

Monday, April 28, 2008

Primed and Pumped!


Finished priming everything this weekend. Today I put everything together to be sure there wasn't any issues before I get it painted. (Tomorrow!)

I had to deepen the control cavity with the router. One of the anchors for the bridge is slightly undersized. One fits snugly in either hole and the other one is loose in either hole, hmmm. I bought some epoxy glue to fix the loose one. The epoxy did the trick.

Otherwise every thing else fit fine.

I bought the paint today and my friend Ray is coming by to paint it tomorrow. Check out his work at FLAMES ETC.

The pick guard material came Saturday and this one worked out fine. Of course as always there are things I would change but it will do just fine. I bought a 45 degree bit for the router and made a template out of 11/16th plywood. This bit has a bearing verses the straight shaft of the Dremel bit. The thickness of the plywood is needed to guide the router bit. Stewart McDonald has instructions for this on their website.

I couldn't leave the pickguard alone, so I took it off and tweaked it a little. Oh well.

The pick guard isn't scratched. It's the protective film that covers it. I'll remove it after the final assembly.

For the more astute observer, the strap button on the heel of the bass is positioned higher up than the normal position. I saw a picture of another bass with the same set up and decided to use it on this project. The basswood is a very soft wood and I was afraid that the routing for the bridge might have weakened the area where the strap button would normally be located, so I moved it up and away from the route.

Regular guitars with tremolos have a lot more wood between the bridge and the heel of the guitar.

Tuesday, April 22, 2008

Headstock

After a bout with poor clearcoat and resanding and starting over: Here is the finished product.


The first coat of primer went on the back of the body.

Monday, April 21, 2008

SCORE!

Drove by my uncle's cabinet shop and he was there! I got to use the bandsaw to cut out my guitar today. I also use the drill press to drill out the holes to mount the bride and used the sander to get most of the edges sanded.

Here it is after routing the edges and sanding.

Here is a front view with the arm bevel completed.

Here is a side view of the arm bevel and the belly bevel.

Here is everything in place.

I still have to make the final pickguard. I have to make it a little larger to cover the control route. I have to make it larger so the tone control would fit. So even if I didn't screwed up on the pickguard, I would have to make it over again.

Ready for primer.

Sunday, April 20, 2008

More parts, more routing


Well I forgot to order my input jack before, so I ordered it and some chrome knobs from Guitar Parts Resource. Wow, they ship fast and the shipping charges are reasonable.

Anyway, I had to route the hole for the jack, so here is how it turned out. This is one of the failed pickguards.

Saturday, April 19, 2008

Just looking for a minor victory

Today I lined up my tuners on the headstock with a square, drilled all my holes and installed them. Perfect. I used some masking take to hold the bushings on the front side. When I took it off, it took off my logo.

So I took off all the hardware, sanded and clear-coated it again. Printed off new logos and I am currently waiting for the paint to dry.

Oh by the way, Drilled the holes for my tremolo cover. Screwed that up too. I think this project is going to be placed on hiatus for the rest of the weekend.

I might go with a metal cover for my tremolo cover and paint it to match. Later. Time for Mexican food in Atlanta at Rosa Mexicana.

Friday, April 18, 2008

Pickguard 102

After yesterday's failure with making the actual pickguard. I decided to try again.

I realize that the when the Dremel runs too hard, too fast and long, the bit heats up and melts the template. The Dremel router bit doesn't have a bearing but a section of the shaft that extends below the cutting bit. It was a minor set back and was still salvageable.

I cut the pickguard material almost flush with the template and then sanded it even with the template. The with the 45 degree router bit in my Dremel, I went very slow at a slow speed, stopping frequently to allow the bit to cool. This worked great.

Then I attached the pickguard to the body and use my template cutting router bit to cut out the neck and pick up sections. This would line the pickguard up perfectly with the existing cut outs on the body. All went well until the top section that runs along the neck, it snapped off. I am out of material for the pickguard and I had just enough to make the cover plate for the tremolo on the back of the giutar.

Thursday, April 17, 2008

Bummer

My uncle wasn't at his shop today so I came home and proceeded to cut out my pickguard,

Now I have already made a trial run with a piece of cheap plexiglass, But today my Dremel decides to go haywire and the bit slips, ruining my pickgaurd material as well as the template. I think I still have enough material to make another pickguard and the tremolo cover.

So I started making a new template, When I started to drill out the corners for the pickups, then the template cracked. Uggg! So I started to cut out another one. I drilled everything first so I wouldn't was my time cutting it out if it cracked. So far so good.

I still have some final sanding to do and I have to drill the holes for the controls. I think I'll reposition the knobs a little closer together to make more room for the tone control at the end.

Lesson learned. The acrylic sheets make it easy to transfer the design and to smooth out the rough areas, but any template that needs a router's touch should be made of something thicker and less resistant to chipping and cracking.

I'm tired of this and it is time for beer and wings.

Wednesday, April 16, 2008

Router Work Completed

I put together the fretless yesterday and I have some bugs to work out. I was really bummed out.

Got the last order today that had my router bits. I was able to do all of my routing


The router kicked up a wood chip and cracked the template and it ended up making the lower route crooked. I can sand this out and straighten it out. This will cover the tremolo springs on the back of the body.


The dark area is from mineral spirits used to clean off the residue left by the double sided carpet tape. The carpet tape was used to secure the templates to the wood.

Saturday, April 12, 2008

The Bridge is Here


The bridge came in today but without any instructions. I was able to download them from the internet. Hipshot sells a template set for $40.

The instructions really try to steer you in that direction, with measurements listed like 3 63/64 inches and 3 13/32 inches. I need a laser for that kind of accuracy. I figure I would measure to the next visible measurement and cut inside the lines, and with the additional layers of paint would make it close enough. How much difference is 4 inches from 3 63/64 and 3 7/16 from 3 13/32? This thing moves after all. I think that clearance and coverage of the top route would be most important.

Anyway, it was time to make another template. I did this on the body template and boy did I screw it up. I cut it with a plastic cutting wheel on my Dremel and it took forever. It ended up real uneven and oversized. I made another on on a seperate piece and it came out nearly perfect. Drilling a pilot hole and a jigsaw is the best way to make the templates. Then I took down the remaining material with the Dremel and file and ended up smoothing it all up with the palm sander.

The only other real mistake I've made is that I had to redrill a hole on the pickguard because the original one was too close to the neck.

As soon as I quit agonizing over the choices of router bits to use; I will be ready to start routing and cutting out the body.

Everything else is on order and will be here soon.

Thursday, April 10, 2008

More Templates and My Fretless Bass


I made the template for the pickguard last night. My pickups arrived yesterday. I put them all together to get and idea of what the finished product will look like. Because it was hard to see both templates; I put a piece of paper under the pickguard template. At the top with the blueprint is the template to route out the neck pocket.


I put my fretless together for the family portrait. Then I took the body out for yet another coat of tung oil.

I put the neck and bridge on the fretless last week to line up the holes for the neck plate. I had the top and bottom strings on it to line it up. So I got a chance to play it a little bit. It's going to be fun learning how to play the fretless.

I bought a palm sander today and it makes smoothing out the edges of the templates much easier than with a rasp, file and sandpaper. I finished the pickguard and made the neck pocket template this afternoon.

I'm through with the templates until I get my bridge. Then I'll be ready to route everything out and then cut it out with a bandsaw.

Wednesday, April 9, 2008

Template


Today I started making my template from my blueprint. The template is made from a very thick piece of plexiglass.

I centered the neck with the midline of the bass body from the blueprint. To be sure the bridge and pickips will also be centered, I made a midline mark on the template to use to line up my pickups and bridge.

I've cut out the portion for the control and batteries compartment routes. I still need to cut out the bridge pickup and the bridge routes. I have to wait till I get those pieces in to be sure it will be accurate. Plus an additional route will be needed on the back of the body for the tremolo.

I will cut out a separate template for my pickguard and I'll use that template to route the neck pickup to be sure it will line up on the finished product.

The body blank finally arrived.

Sunday, April 6, 2008

Site for Strat Bass Builder

After search through the talkbass forum again, I found the link to the manufacturer that makes the short scaled bass that looks like a stratocaster

Landing Bass Three Single Coil

Landing Bass Dual Humbucker

This builder is using EMG pickups and electronics. The humbucker model has the option for the same pickups that I bought. I guess I was on track in my choices.

Well here are their prices. Ouch! I don't feel as bad for trying to pick up some higher price items for my build.

I think I like my fusion design better than the "true" stratocaster body. It doesn't seem as crowded, and I believe it will work better proportionally with the standard 34 inch scale. Pluse the Fender clone neck lends it to look more like a strat.

I'm sure my bass won't have as nice of a finish as these guitars, but they don't have a tremolo!

Saturday, April 5, 2008

It's Not a Hardtail Anymore!

Just had a coup on Ebay. Someone was trying to snipe me at the last moment but my highest bid was too high and he couldn't get there before the time ran out.

Too bad, I wished I got my bid at the two minute mark but I still got it WAY below retail. (I wouldn't EVER pay the retail price for something like this!)

It's in chrome, so I guess I won't be buying black hardware again. Anyway, the classic Strat has factory chrome.

Hipshot Bass tremolo

The neck arrived today and the logo is in place: just waiting on a name.

The wood blank is delayed, I hope it's not a problem.

Pickups Choice and Placement


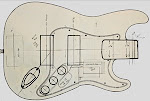
The Stratocaster has three single coil pickups. If I wanted to stay true to form, I could use three single coil pickups like the pick ups used in the '51 telecaster bass.

Without going into my calculations, the middle and bridge pick ups on the stratocaster fall roughly within the positions of the bridge pickup of a jazz bass and the middle in the neighborhood of a precision pickup.

The neck pickup would be similar to some of the older Gibson basses.

I seriously considered going this route but Ebay changed my direction. I was able to buy two dual coil EMG pickups for a reasonable price. Again, these EMG pickups are a complete set each and will be combined for an eighteen volt system per recommended by EMG.

With the red bass I consider this type of pickup for the bridge pickup to get a "musicman" type of sound if I wanted it. I never own a musicman bass and thought it would be something different to experience.

The pickups I bought are exactly like the one I was considering for the other project. With a push/pull pot, the pickup can be used as a sigle coil or a humbucker. With the bridge pickup in the area of the jazz bridge/musicman pick up and the neck pickup in the region of the precision /jazz neck position; I believe I might be able to create the sounds of several different basses.

Neck: humbucker only - Precision bass

Neck Humbucker/Bridge Single coil - PJ bass

Dual single coil - jazz bass

Bridge humbucker only - musicman.

I will place the pickups where the single coils will be closer to the bridge and neck than the humbucker to get a more authentic jazz sound. The jazz pickup (single coil) is closer to the neck than the precision and closer to the bridge than the musicman.

Keeping with the three control knobs of the stratocaster, I will use the two push/pull pots to control volume and use a EMG BTC tone control.

EMG-35TW PickUp

EMG BTC Tone Control

Full Size Blueprint


Once I combined the two guitars shapes into one; I erased the unwanted lines in Microsoft paint. I printed out the resulting image.

With the print out; I measured across the widest point of the print and compared that to my precision bass. For example my print out was six inches across and the measurement across the precision bass at the same area was twelve inches. My image needed to be twice as big. So in "page set-up" in Microsoft paint, I increased "print image" to 200%. When I printed out the image the second time: it printed over several pages and I combined these images to make my blueprint.

I wanted to make my bass slightly smaller (11 1/2 inches wide), so in my project I actually printed out mine to be 186% larger.

I did rearrange the placement of the control knobs and shifted the jack plate closer to the end to line up with structural elements to keep it similar to the strat profile.

The Strat Bass Idea


I was going to stop building basses after I finished my fretless project. With the encouragement from my wife (the green light to continue)

I started the plans for an idea that I had for a stratocaster-inspired bass. My son once own a Stratocaster and Fender makes a Telecaster bass, why not a Stratocaster bass?

I also saw a link for Wolfgang Van Halen's strat-inspired bass. It was really "busy" looking and had the control plate of a jazz bass on it. It had a non-working pickup for show and I think it was a short scaled instument. I also think it was built on a jazz bass body.

I found a like to a company that makes a strat inspired bass but I believe it is also a 30 inch scale instument, but I cannot find it again.

The body style of the Stratocaster is similar to the Precision bass; so that is where I started. Just putting the strat's components on a precision's body was a start, but the top and bottom "horns" were different.

Blowing the strat body up to the same width as the precision bass had the bridge falling off the end of the bass. To increase the scale of the strat to fit the dimensions of a full scale bass would result in a very wide and heavy So I morphed the two instruments together with Photoshop. I took the frame work of the precision bass and overlayed it with the stratocaster. When the stratocaster was made to be the same width as the precision, it is still too short. The outline of the Stratocaster then was manipulated to be the same length as the Precision.

The Logo

If I am going to build bass guitars, I am going to need a logo. I found a posting on the internet on how someone else did it but It seemed very labor intensive. There are options to buy one off of Ebay but that seemed to lack the personal touch I wanted.

I was walking through Hobby Lobby one day as my wife shopped and I came across decal paper made by Testors. Anyone who has built models knows about water-slide decals.

Essentially this is a clear transparency that can be printed upon by a inkjet printer. Testors makes an opaque one too.

I thought I would give it a try. I created my logo from several components.

The bass cleft and staff was downloaded from the internet. I did have to edit it to make the staff long enough for my use. I used a program call "Snagit" to get the individual components used and my Photoshop Elements program to edit and combined them. I used Microsoft Word to get the letters for the logo.

I really hit the learning curve for Elements for this project; learning about layers and such. The finished project was very rewarding.

If you are interested in creating a logo of your own; I would suggest using the largest elements possible, so when you shrink it down to the size you need, it will retain as much detail as possible. Also use the sheet feed option for your printer for a straighter shot through the printer in order to keep the transparency from bending (it takes the wet ink off!) Testors recommends a transparency fixative to spray over the finished product before you apply it, but I just used clearcoat.

Big Red


So I had an extra Neck and now an extra body. All I needed were a few more parts and I could build another bass.

Ebay to the rescue. Again, I bought the majority of parts off of Ebay. I found the bridge and tuners, all in black from varies listings on Ebay.

I found the jazz pickup for the neck in a smoking deal from Ebay. Later I purchased the precision pickup, also from ebay.

The pickups on this bass are active EMG pickups. The nice thing about EMG these pickups, each came with a volume and tone pot, battery clip and jack. I combined the sets to wire this bass in a standard jazz bass configuration but with an eighteen volt system instead of the standard nine volt. EMG recommends the 18 volt set up.

I had all black hardware and a very yellow maple neck. I had to choose a color to bring all of this together. I decided on a candy apple over silver, clearcoated on top; all from the local auto parts store.

Everything came together and made a great bass. The Eden neck is very straight and easy to play without any adjustment to the truss rod. The bass has a great sound whether it is plugged in or not with great sustain. An Eden neck is on the way for the Strat Bass. Now I had an extra neck and an extra body.

The Beginning

I recently became interested in building a bass guitar. My first project started as a fretless, but after several twists and turns has turned into two, no make that three guitars.

As I bought parts and other parts became available, the original project changed.

The very first one was to add a neck to a finished body for my son. I was originally going to modify this body for my project but I decided it was too nice for that and my son wanted a bass. But, with the purchase of a new Dremel tool, I did change the neck pickup of this Jazz bass clone to a precision pickup. I also made my first pickgaurd for this bass and shortly after that, made one for one of my existing bass guitars.

The neck I originally bought for my son's bass was way too yellow to match the finish on the body, so I had an extra neck.

I purchased another body for the fretless project and with the trusty Dremel, I began to route a pickup pocket for a jazz pickup in the bridge location of this precision bass body. The original idea was a bass that looked similar to the Marcus Miller signature Fender Jazz Bass. Unfortunately, the wood grain wasn't of the quality for a natural finish.

Marcus Miller Signature Jazz Bass


After a lot of time of sanding and priming, the body was ready to paint. The original idea was to paint the body and the matching headstock a metallic copper to match my car. But due to delays due to weather and work conflicts, my painter wasn't able to get to it before the project took another turn.

I found a Warmoth body on Ebay. The body was made of walnut with beautiful grain, perfect for a natural finish. I won the auction and now I had an extra body and neck.